
DIY Newborn Photoshoot
- Leanne Spragg
- Jul 2, 2021
- 5 min read

Updated: Jul 20, 2021
Due to obvious circumstances, I have had to cancel/decline a couple of newborn photoshoots. This has made me feel so sad that those people that won’t get this very fleeting and precious time documented. Obviously it’s much more important that everyone, especially teeny babies, are staying safe but I thought I could offer something to help parents take their own newborn photos. So here are some simple tips to help you along your way whether you are taking them on a fancy camera or just using your phone.
1. Where
Take a look around your house at different times of the day and see which room offers the best light and at what time of day. Try to avoid any room with direct sunlight. This may be nice for some type of photos but for newborn you are ideally looking for soft and even light. The master bedroom is usually the best place as the bed is a perfect height for placing the baby and the bed is usually placed near to a window.

2. Time
In my experience the best time of day to photograph a newborn is mid-morning. Obviously every baby is different but it generally means you are not entering ‘witching hour’. Take note of when the best time would be for you and your family to ensure a relaxed photoshoot.
3. Styling
Think about the end result and the type of photos you would like to end up with. I personally prefer neutral so that the end result looks timeless. If you are planning to have the baby on the master bed, think about the sheet covers. Are happy with patterns and bright colours or would you prefer a more neutral and plain ‘backdrop’ for the baby. You would need to be careful of any bright colours reflecting onto the baby skin. Pick out some special blankets and teddies that you would like to include in the photoshoot and have them ready near by. In regards to clothing, I prefer the baby in a neutral vest or outfit that shows their hands and feet so that you can capture those little details. Also, this way you don’t have to keep getting the baby changed and unchanged at risk of upsetting them and you can wrap them in blankets or swaddles to keep them warm and to add variety to the photographs. If the rest of the family or sibling are jumping in the frame, make sure clothing is simple and comfortable. Think about the colours of outfits and how they complement each other. Preferably either stick to cool or warm colours with no overly bright/patterned designs that will take away what is happening in the photos.

4. ‘Posing’
Firstly you should never try any poses of newborns without the correct safety training. I have not had any training so I simply place the baby down and let them get comfortable, sometimes I use a swaddle and sometimes I place them on their tummies (if they settle this way usually) and that is it. The most important thing to me is the light and documenting your baby exactly how they are with minimal props and no posing.
For baby portraits you want the baby’s face at a 45-90 degree angle from the light source (usually the window) this will create soft light and shadows and highlighting their features nicely. Try and get close ups of babies hands, feet, hair, eyelashes. Take photos at all different angles and see which you like best. For a sense of scale, place a favourite teddy next to baby, put your hand on their tummy or head or cradle their feet. I would take this opportunity when the baby is settled to get any siblings involved. Ask them to lie next to them and take a shot from above or get them to lean behind them and kiss their head, count their toes or fingers or read them their favourite story. Anything that will get them to interact with the baby a little and get real connection shots. Connecion is key!
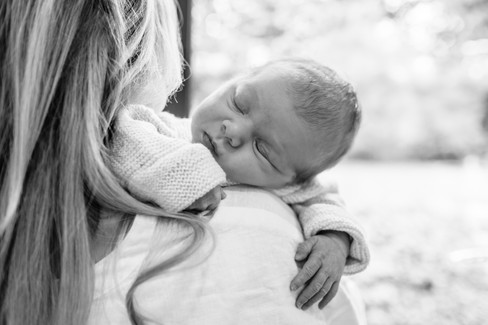
Here are some examples of some easy poses below. For parent and baby poses, standing next to a window will offer the best light, snuggle and love on baby and hold them however feels comfortable. Just make sure light is hitting the baby’s face and take photos at all different angle, get up high if you can to get a ‘from above’ perspective and make sure you get those details, e.g. daddys hand cradling babys feet or stroking hair etc. Think about the tiny details you want to remember. For a full family portrait, keep it simple and set up a tripod or a stool to place your camera on or prop your phone up. Set the camera on timer and burst mode or use a remote if you have on and all jump on the bed or the sofa. Take some looking at the camera, looking at the baby and just messing around. I guarantee the messing around ones are the ones you will love the most.


5. Settings
When my first was born I took some photos of him on auto mode and they came out fairly well and I still love them now. However, it is always best to take photos on manual so that you have complete control over your light and the look you would like to achieve. Even on your phone you can control all the settings. I won’t go into too much detail as this will be a whole other blog but I would usually use the following settings (note – what is right for me and my style might differ from someone else’s – this is just how i do it)
Shutter speed – for sleeping baby or a parent holding the baby and keeping fairly still I would have the shutter speed at no less than 125 For awake babies and anyone else that might be moving fairly quickly in the frame I would have the shutter speed at no less than 250. If there is a toddler jumping around I would try to get higher than 250.
Aperture – For portraits of baby and one parent and baby anything between 2.8-3.5. Think about what you would like in focus and how much depth of field you would like. For full family or sibling and baby, anything over 3.5 but preferably up to 5.6. I am quite ‘risky’ compared to others in regards to aperture and like a low aperture. Ideally you are looking for all eyes to be in focus for portraits.
ISO – For me ISO is always the ‘compromise’ factor. I would set this at whatever it needs to be to get the correct exposure. I would consider adding flash or another light source (I never really have to do this) If I had to push ISO over 1600 as I am not overly keen on too much grain. I would practice with your settings on a doll or teddy beforehand as every camera is different in regards for its ISO capabilities.
Here is a great resource that explains this a bit further if you are a bit bewildered by what I am talking about – https://www.colesclassroom.com/understanding-the-exposure-triangle/
Focus point – think about what you want to focus on and remember to move this point. If it is a portrait of the baby, you would want the focus point on the eyes.
Always do a test shot and check the back of your camera to make sure you are getting the exposure correct.
I would love to see what you get.
Leanne xx


Comments